Resource packs installation
Follow the guide for successful and easy installation.
Step by step tutorial covering the installation.

The following instructions expects that Minecraft is already installed on your system and that you have ran the game at least once.
Prerequisites
Java
Before installing Mods, you must have Java installed on your computer.
You can download Java from https://www.java.com/en/download/.
Mods
Understanding dependencies
The following graph shows the dependencies between the different mods, shader pack and the resource pack.
Fabric Loader ───┐──────────────────── Iris
            Fabric API                  │
      ┌──────────┴──────────┐           │
Continuity              Puzzle    Shader Pack
      └──────────┬──────────┘           │
           Resource Pack ───────────────┘
Downloading and Installing Mods
We'll download and install the mods in the order of the dependency graph, starting with Fabric Loader and Fabric API, then Iris, followed by Continuity and Puzzle, and finally the shader pack and resource pack.
Fabric Loader and Fabric API
You can download Fabric Loader from https://fabricmc.net/use/installer/.
Then double-click the downloaded .exe file to open the installer and select your Minecraft version and click install.
Next you'll need Fabric API, which you can download from https://www.curseforge.com/minecraft/mc-mods/fabric-api.
After downloading the .jar file, move it to the mods folder in your .minecraft directory.
The mods folder is located at:
C:\Users\YourUsername\AppData\Roaming\.minecraft\mods
You can also open it by pressing "Win + R" and typing this in the Run dialog.
%appdata%\.minecraft\mods
Iris
You can download Iris from https://irisshaders.dev/download/
After downloading the .exe file, double-click it to open the installer then select your Minecraft version and tick the "Enable Fabric mod support" checkbox and click install.
If you see a Mods Folder Detected popup, click Yes.
Puzzle
You can download Puzzle from https://modrinth.com/mod/puzzle
After downloading the .jar file, move it to the mods folder in your .minecraft directory.
Continuity
You can download Continuity from https://modrinth.com/mod/continuity
After downloading the .jar file, move it to the mods folder in your .minecraft directory.
Continuity is not required if you use the free version of the resource pack.
Shader pack
Assuming you have already downloaded your desired shader pack, move the downloaded shader pack .zip file(s) to the shaderpacks folder in your .minecraft directory.
The shaderpacks folder is located at:
"C:\Users\YourUsername\AppData\Roaming\.minecraft\shaderpacks"
You can also open it by pressing "Win + R" and typing in the Run dialog, then press Enter.
%appdata%.minecraft\shaderpacks
Do not extract the contents of the .zip file, just move the .zip file itself.
In-game go to options, then video settings, then shaders, and click on the shader pack you just moved to the shaderpacks folder to apply it.
Resource pack
Assuming you have already downloaded your desired resource pack, move the downloaded .zip file(s) to the resourcepacks folder in your .minecraft directory.
The resourcepacks folder is located at:
"C:\Users\YourUsername\AppData\Roaming\.minecraft\resourcepacks"
You can also open it by pressing "Win + R" and typing in the Run dialog, then press Enter.
%appdata%.minecraft\resourcepacks
Once again, do not extract the contents of the .zip file(s)
In-game go to options, then resource packs, and click on the resource pack(s) you just moved to the resourcepacks folder to apply it.
Loading order
If you are using resource pack with addons, then the loading order from top to bottom will be:
Basic > Bonus > Mobs > Items > Foliage
Not having the correct loading order may cause issues with the textures.
Continuity Glass Pane Fix
In-game in the resource packs menu, enable the Continuity Glass Pane Fix and make sure to put it below the resource pack(s).
The final loading order should look like this:
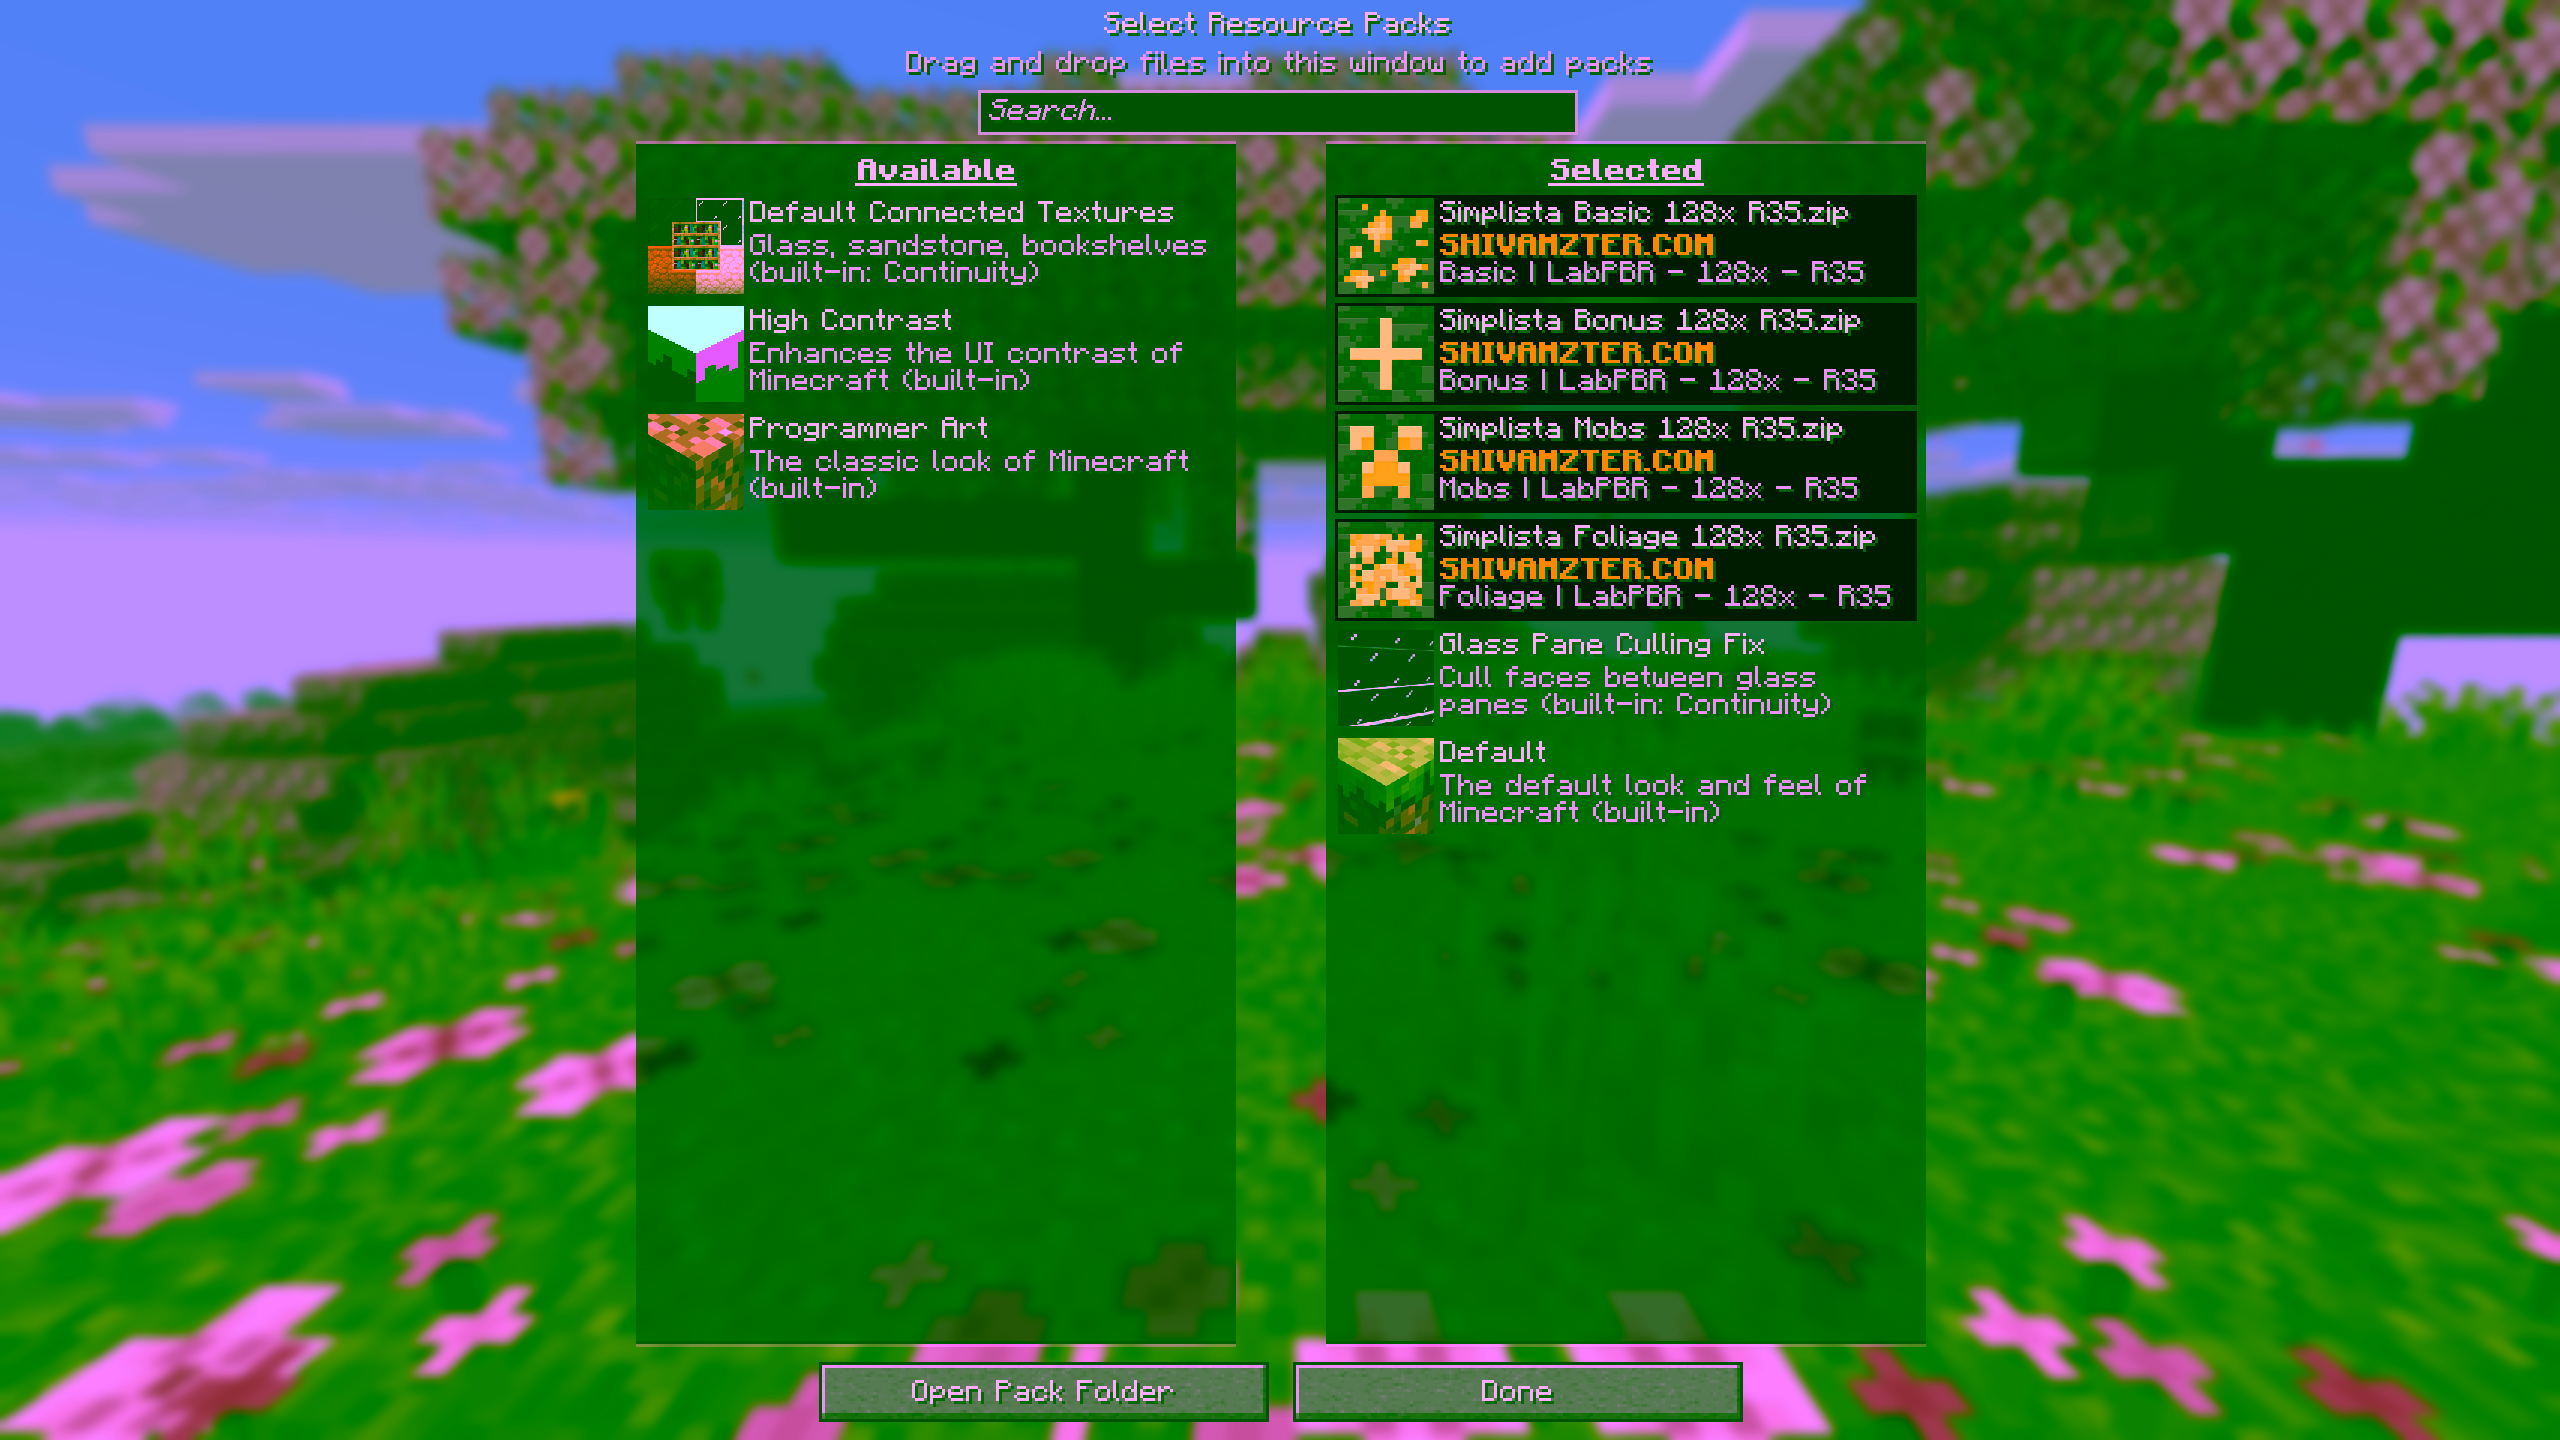
If you see the version mismatch warning like above, you can safely ignore it.
Shader settings
The last step is to change shader settings to utilize all features of the resource pack.
For this kindly move to this specially created dedicated page: https://shivamzter.com/installation/java/shader-settings
Optimization
If you're encountering performance issues, like micro stuttering, it is recommended that you take a look at your RAM usage in-game by pressing F3 on your keyboard.
If your RAM usage is more than 75%, then it is recommended to allocate more RAM to Minecraft, but never allocate more than half of your system’s RAM, and no more than 6GB max unless you're using many mods that require more RAM.
RAM allocation
In order to allocate more RAM to Minecraft, open the Minecraft Launcher, then go to "Installations" and select the 3 dots located beside the installed platform and click "Edit", then click on "More Options" and in the JVM ARGUMENTS field, change the -Xmx value.
For example, if you want to allocate 4GB of RAM, you would change it to -Xmx4G.
After that, click on "Save" and launch the game.
Making sure the right amount of ram is allocated.
If you allocate too much RAM, it will also cause micro stuttering, the very issue that were trying to fix in the first place.
The right amount of RAM allocation should keep your usage around 75%.
Step by step tutorial covering the installation.